

Since it's officially summer, it's time to get your "GRILL ON!" The other night we had the rug rats, sister in law + G.W.M over for dinner and served a very ethnic meal. I made a Garlic-Mustard Chicken and a healthy Mediterranean barley salad. The chicken dish was full of flavor and the spices were more reminiscent of Indian flavors. The chicken would be great wrapped in a pita with some tzatziki sauce or served plain as-is. So next time you're in the mood for a quick weeknight meal, this is an easy go-to.
Garlic mustard grilled chicken skewers
Adapted from Bobby Flay
6 servings
Garlic-mustard glaze
• 1/4 cup whole grain mustard
• 2 tablespoons Dijon mustard
• 4 cloves garlic, finely chopped
• 2 tablespoons white wine vinegar
• 1 tablespoon low-sodium soy sauce
• 1 tablespoon honey
• 1 tablespoon finely chopped fresh rosemary leaves
• 2 teaspoons Spanish paprika
• 1/4 teaspoon kosher salt
• 1/4 teaspoon freshly ground black pepper
Grilled chicken skewers
• 2 pounds chicken breasts – pound to one inch thickness
• Eight wooden skewers, soaked in cold water for 30 minutes
Preparation
For garlic-mustard glaze:
Whisk together all of the ingredients in a small bowl,cover,and let sit at room temperature.
For grilled chicken skewers:
1. Heat your grill to high.
2. Pound chicken breasts to one inch thickness and cut into 1-1/2" cubes. Then cut slits into each piece of chicken making sure not to cut all the way through the chicken. This will help the marinade penetrate through the chicken. Pour half of the marinade over the meat and let marinate up to three hours in fridge. (The original recipe requires no marinading but I thought it would add more flavor to the chicken) Just before you are ready to grill, skewer chicken pieces onto skewers.
3. Grill the meat, turning once and brushing with the remaining glaze, for 4 to 6 minutes until golden brown, and slightly charred. Transfer the skewers to a cutting board and let rest for 5 minutes.
4. Place the skewers on a platter and serve hot or at room temperature
Garlic Mustard Glazed Chicken Skewers

![]()
Zucchini Sticks

These are a great alternative to the deep-fried appetizers you stuff your face with during happy hour. They're guilt-free and you're gettin' your veggies in for the day. Eat them with ketchup or ranch dressing and even zucchini haters will love them. Enjoy!
Zucchini Sticks
Adapted from Cook's Illustrated
2 servings
3 medium zucchini sliced into 3" x 1/2" sticks
3 slices hearty white sandwich bread, torn into 1-inch pieces (should equal 1 ¾ cup)
1/2 small shallot, minced (about 1 tablespoon)
2 medium garlic cloves, minced or pressed through garlic press (about 1/2 tablespoon)
1 tablespoons vegetable oil
Ground black pepper
1/4 teaspoon minced fresh thyme leaves
1 tablespoons minced fresh parsley leaves
1/8 cup plus 3 tablespoons unbleached all-purpose flour
1 1/2 large egg whites
1 1/2 tablespoons Dijon mustard
1. Pulse bread in food processor until coarsely ground, about eight 1-second pulses (you should have about 1 ¾ cups crumbs). Transfer crumbs to rimmed baking sheet and add shallot, garlic, oil, 1/8 teaspoon salt, and 1/8 teaspoon pepper. Toss until crumbs are evenly coated with oil. Bake until deep golden brown and dry, about 15 minutes, stirring twice during baking time. (Do not turn off oven.) Cool to room temperature. Toss crumbs with thyme, and parsley.
2. Place 1/8 cup flour in pie plate. In second pie plate, whisk egg whites and mustard until combined; add remaining 3 tablespoons flour and whisk until almost smooth, with pea-sized lumps remaining.
3. Spray wire rack with nonstick cooking spray and place in rimmed baking sheet. Dredge 1 zucchini stick; shake off excess. Using tongs, coat with egg mixture; let excess drip off. Coat all sides of zucchini with bread crumb mixture, pressing gently so that thick layer of crumbs adheres. Transfer breaded zucchini to wire rack. After you are done breading all the zucchini let them rest for 15 minutes so breading can adhere to zucchini.
4. Spray zucchini sticks with PAM and sprinkle more salt over top.
Pre-heat oven to 400F and bake for 20-25 minutes until brown and cooked through. If zucchini sticks are browning too quickly, drop the heat to 375F.
![]()
$50,000 Burger
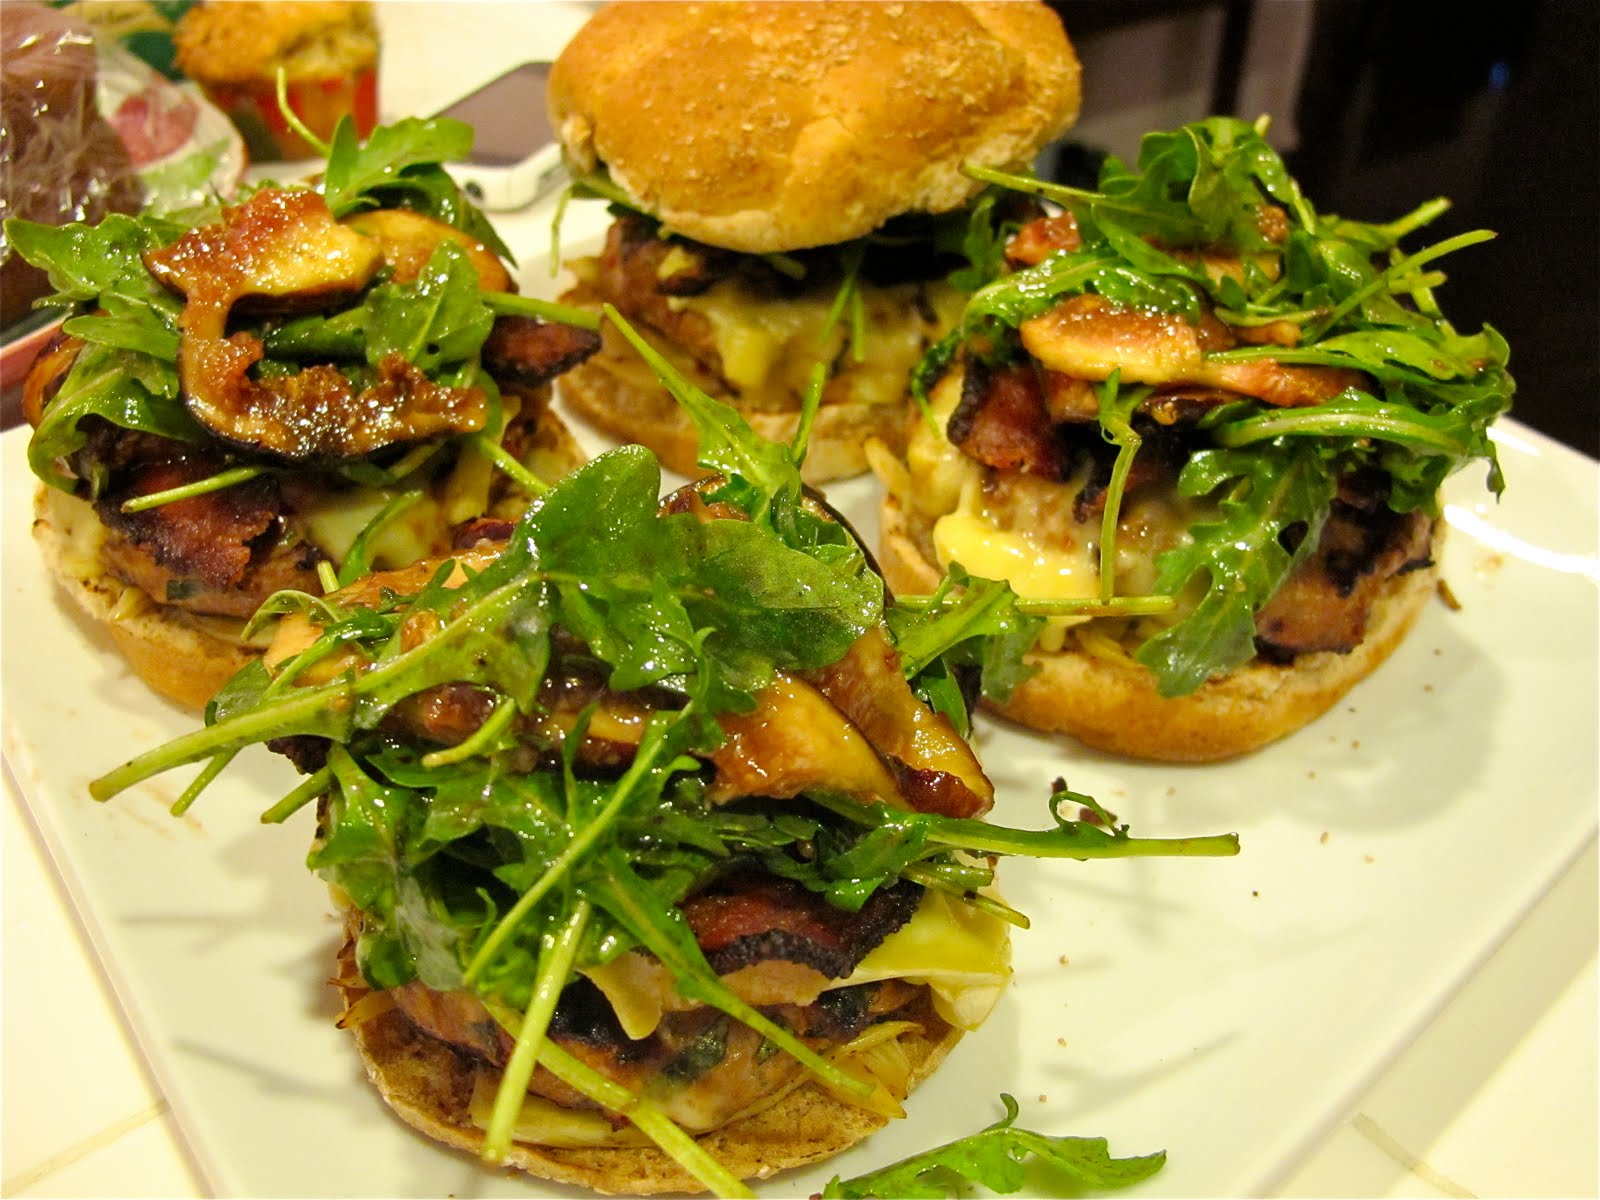
Hmmm...so I bet you're wondering what this burger is all about. Fifty grand and a burger? Well, this burger was the winner of the Food Network's Challenge, "Build-a-Better Burger" showdown and the cook won $50,000 bucks!!
Let me just tell you, this burger is FAB-U-LOUS, with a capital F!! Obviously from the name itself you know this isn't your average burger. One bite and you'll be hooked! The flavors are very subtle and sneak up on you. This may seem like a lot of unusual ingredients, but when all those flavors hit your taste buds you get sweet, salty, savory all in one bite and it packs a flavorful punch. NUM! Is your mouth salivating yet? You know you want one!!
WARNING: This burger makes a very tall burger, so get ready to assume the position. Lean over, spread your elbows, open wide and dig in!
I'm submitting this to ">TASTY TUESDAY
Born in Berkeley Burgers
Adapted from here
For the patties:
• 1/2 pound ground turkey
• 3 tbs packed fresh basil leaves, chopped
• 3 tbs drained and chopped sun-dried tomatoes , packed in oil
• 2 tbs grated onion
• 1 garlic cloves, minced or pressed
• salt to taste
For the Lemon-Grilled Fennel:
• 1/2 medium-sized lemons, preferably Meyer lemons
• 1 medium-sized fennel bulbs, tops removed, sliced thin
• 1/2 tablespoons extra-virgin olive oil (recommended: Colavita)
• pinch salt
• 4 slices thick-cut black pepper bacon or regular thick-cut bacon
For the Arugula -Fig Topping:
• 4 tbs chopped walnuts
• 2 teaspoons balsamic vinegar
• 2 tablespoons extra-virgin olive oil (recommended: Colavita)
• Salt
• 4 fresh figs, stemmed and sliced lengthwise
• 1 to 1/2 cups pre-washed bagged baby arugula, roughly torn
• 2 to 3 tablespoons vegetable oil, for brushing on the grill rack
• 2 oz aged Teleme cheese sliced thinly (Camembert or Brie may be substituted)
(I used Fromager d'Affinois Brie)
• 2 good-quality hamburger buns, split (Oroweat Wheat Buns)
*I like a tart vinaigrette so I use a 1:1 ratio vinegar to oil
Directions
Prepare a medium-hot fire in a charcoal grill with a cover, or preheat a gas grill to medium-high.
For the patties:
Combine the chuck, basil, sun-dried tomatoes, onion, garlic, and salt in a large bowl, handling as little as possible. Shape into 2 patties to fit the bun size. Loosely cover with plastic wrap and set aside.
For the fennel:
Grate 1/2 teaspoons zest from the lemons. Put the fennel rings in a medium-sized bowl (I used half a fennel bulb) and juice the lemon over half the fennel and toss to coat all the fennel rings. Add oil and season with salt. Put the fennel in a grill basket and grill, shaking the basket occasionally, until soft, 10 to 12 minutes. (I did this on the stove top) Transfer the fennel to a sheet of foil, sprinkle with the lemon zest, and wrap to keep warm.
Heat a large, heavy nonstick fire-proof skillet on the grill. Add the bacon and cook until crisp. Transfer to paper towels to drain. Wrap in foil to keep warm.
For the topping:
Drain off the bacon fat from the skillet, wipe out the skillet with paper towels, and set the skillet back on the grill. Add the walnuts to the skillet and toast until golden and fragrant; set aside.
Whisk the vinegar with the oil in a small bowl and season with salt, to taste. Combine the figs, arugula, and toasted walnuts in a medium bowl. Toss with just enough dressing to coat.
When the grill is ready, brush the grill rack with vegetable oil. Place the patties on the rack, cover, and cook, turning once, until done to preference, 5 to 7 minutes on each side for medium. Place the cheese slices on the patties during the last 3 minutes of grilling. Place the buns, cut side down, on the outer edges of the rack to toast lightly during the last 2 minutes of grilling.
To assemble the burgers, place equal portions of the warm grilled fennel on each bun bottom, followed by a cheese-topped patty, 2 bacon slices, and an equal portion of the fig-arugula topping. (I would use a lot of the fig topping) Add the bun tops and serve.
![]()
Stuffed Red Peppers and Roasted Cauliflower Trees

Tonight was a throw everything in your fridge and stuff it into a bell pepper kind of night. However, all the different ingredients made for a delicious and healthy dinner. This meal came together fast, had great flavor and was easy on the wallet. It seems like every where you go red bell peppers are on sale right now - yes, these are apparently the things I notice in my life now - anyway, they're the perfect vessels to stuff things in and make for an elegant presentation.
I love these kinds of recipes. It's so versatile and you can swap out the veggies for whatever you have on hand and add a different spice if you're not a fan of cumin. But the cumin does add a nice smokey taste and the ingenious addition of cayenne - made by moi - added some additional lingering heat as well. I love spicy food so this dish was no exception.  The roasted cauliflower was fantastic as well. When you roast the cauliflower this way, the bottom gets brown and caramelized and it becomes crunchy and chewy. I finished the dish with my new fancy "Fleur de Sel" salt and it added a nice salty bite to the veggies. Aren't the cauliflowers cute! They look like little trees. If that reason alone doesn't motivate you to make the dish, I don't know what will :)
Red Peppers Stuffed with Quinoa, Zucchini and Feta
Adapted from Vegetarian Suppers from Deborah Madison's Kitchen
2 servings
Sea salt and freshly ground pepper to taste
1/2 cup quinoa, rinsed well several times
1 1/2 tablespoons olive oil
1 1/2 scallion thinly sliced into rounds
1 jalapeño chile, finely diced, seeded if desired
1 garlic clove, peeled and finely chopped
1/2 teaspoon ground cumin
1 cups, more or less, fresh or frozen corn kernels (substituted grated zucchini-drained on paper towels)
1/2 bunch of spinach, leaves only, or substitute 1 handful of arugula, torn into pieces
1/4 cup chopped cilantro
1/2 cup feta cheese, cut into small cubes
1/4 cup Riesling or other aromatic white wine
2 yellow and/or orange bell peppers
Cayenne pepper and onion powder to taste
1. Bring 1 cups of water to a boil. Add 1/4 teaspoon salt, then the quinoa. Give it a stir, then cover and simmer over low heat until the grains are tender and reveal their spiraled germ, about 15 minutes.
2. Warm half the oil in a wide skillet. Add the scallions and chiles, cook over medium heat for about 2 minutes, then add the garlic, cumin, grated zucchini and spinach, along with 2 tablespoons water. When the spinach is wilted, add the cilantro, quinoa and feta. Toss everything together, taste for salt, and season with pepper, cayenne, and onion powder.
3. Slice the peppers in half lengthwise without removing the tops or stems, then cut out the membranes and seeds. Simmer them in water until tender to the touch of a knife but not overly soft, 4 to 5 minutes, and remove. Fill a baking dish with the wine, fill peppers with the quinoa mixture and set them in the baking dish.
4. Preheat the oven to 400° F. Drizzle the rest of the oil over the peppers and bake the peppers until heated through, 20 to 30 minutes, then switch the heat to broil and brown the tops until nice an crispy. Serve hot, warm or at room temperature. Serves 2.
Notes: If you make this recipe be careful of how much salt you use because depending on what kind of feta you get, it will add additional salt to your dish. Also, you may be tempted to swap out water for the wine since the recipe calls for such a small amount, but the wine really does add a lovely aroma to the end result.
Roasted Cauliflower Recipe
2 servings
Adapted from 101 Cookbooks
1/2 of a medium head of cauliflower, washed
extra-virgin olive oil
Kosher salt
Pepper
Garlic Powder
*Fleur de Sel to taste
Preheat oven to 400 degrees and place racks in the middle.
Trim the cauliflower. Get rid of the big stalks and stems and strive for uniform, bite-sized little florets. Little trees.
In a big bowl toss the cauliflower with olive oil and the rest of the ingredients. Toss until the cauliflower is well coated and then place it in a single layer on a rimmed baking sheet. You are going to bake for about 25-30 minutes total.
After the cauliflower has been baking for about 15-20 minutes anything in contact with the pan should be nicely browned. Pull the pan out of the oven, rotate each piece of cauliflower so that another side will get some color. Return the pan to the oven and finish with another 7-10 minutes or so. The cauliflower should be tender throughout. Finish with a sprinkling of Fleur de Sel. Serve immediately.
![]()
Strawberry-Blueberry Frozen Yogurt

Since today is officially the second day of summer, I am kickin' things off with some homemade Fro-Yo! This is the healthiest "ice-cream" EVER and tastes fantastic!!! Granted, I won't be swearing off my favorite store bought ice creams "Butter Pecan" and my new fave "Americone Dream," (SO GOOD) but this is a great substitute when you want something cold and sweet on those hot summer nights that'll soon be approaching. Try this recipe with your favorite fruit combination and you too can enjoy Fro-Yo in the comfort of your own home.
Frozen Strawberry Yogurt
Adapted from No Fear Entertaining
Ingredients:
2 1/2 cups of whole fat plain yogurt
1 cup of pureed strawberries (cut up and pureed in your blender or food processor)
Honey to taste (I used 1/3 cup)
Directions:
Mix all ingredients in a bowl.
Pour into ice cream maker and churn according to manufacturers directions until frozen
Scrape into a sealable container and freeze for about 2 hrs or until firm enough to scoop.
OR just put yogurt in container and chill in freezer until firm.
***This could easily be adapted to any fruit you have and can make into a puree...think raspberry, blackberry, cherry or even banana!!!
***Total calories for the entire Fro-Yo is less then 600 calories....WOW!
![]()
Chicken Teriyaki Burgers and Baked Onion Rings

Despite all the chaos on the plate, the burger was scrumptious. These teriyaki burgers were healthy and lean and since I combined the white and dark meat, they stayed nice and moist. The chicken burgers actually tasted very similar to my salmon burgers but they had more of a sweet and savory umami taste due to the savory chicken and sweet teriyaki sauce. I served these with fries and onion rings that I baked in the oven and battered with crushed potato chips. The coating was a bit overwhelming since you couldn't really taste the onion but they were still yummy dipped in ketchup. But next time I think I'll try and find another recipe with a lighter coating. But if you're a lover of all things breaded and crunchy, then this recipe is for you. Mmm....love me some burger and fries! Love me anything squished between two slices of bread.
Teriyaki Sauce
Adapted from White on Rice Couple
Makes about 1 1/2 cups
For the sauce:
• 1 cup of fresh, minced pineapple or 1 20 oz. can of quality minced pineapple
• 1/2 cup of low sodium soy sauce
• 1” knob of minced ginger (about 20 grams)
• 3 Tablespoons brown sugar
• 2 cloves of minced garlic
• 1/2 tsp of vinegar (apple cider or rice vinegar)
• 1/2 tsp sesame oil
• 1 Tbs cornstarch
• 1 Tbs cold water
• Add more sugar or honey to taste
1. For the sauce: In a blender, combine: soy sauce, 1 can of minced pineapple (or 1 full cup of the minced fresh pineapple), ginger, garlic, brown sugar, vinegar, sesame oil. Blend all liquefy all ingredients until well combined or until pineapple and ginger are crushed very well. At this stage, you can decide if you want a finer sauce by straining the pulp out. If you like the sauce a little thicker with chunks of pineapple, then do not strain.
2. In small bowl, mix cornstarch and cold water. With fork, break apart all the cornstarch clumps until liquid is smooth (cornstarch slurry).
3. Transer teriyaki liquid to sauce pan. Heat up for about 1 minutes or until hot and bubbly. Remove sauce pan from heat and immediately stir in cornstarch water mixture. Stir rapidly till sauce thickens. Allow to cool.
4. Add extra sugar for sweetness or extra vinegar for tang. Customize the teriyaki sauce to your taste!
Chicken Teriyaki Burgers
Adapted from here
8 servings
• 1 lbs each of chicken breast and thighs
• 2 green onions
• 1 1/4 tsp sambal oelek (I would use more next time)
• 3 cloves garlic
• 3 tbs cilantro, minced
• 1 tsp salt and pinch of pepper
• 1 egg
• 2/3 cup panko or bread crumbs
• 1/2 cup of teriyaki sauce
• 8 sesame buns, split and toasted
• 8 leaves red lettuce
• 8 1/4-inch slices of pineapple
• Thin slices of tomato
Directions
In a large bowl, mix together the chicken, panko, egg, green onions, chopped cilantro, garlic, sam bal, and salt. With oiled hands form mixture into 8 patties. To make patties uniform in size I used the lid of a jar which was a little bigger then my palm. Cover lid with plastic wrap and form patties inside the lid to to make them all uniform in size.
Heat oil in a large non-stick frying pan over medium-high heat. Add chicken patties and cook on both sides, brushing each side with the teriyaki mixture, about 10 minutes, or until fully cooked through. Grill pineapples on grill until heated through and grill marks form. Place burgers on toasted buns and top with lettuce, pineapple and Ginger Mayonnaise.
Ginger Mayonnaise:
• 1/4 cup mayonnaise & 1/4 cup fat free greek yogurt (Fage brand)
• 2 teaspoons minced fresh ginger
• 2 teaspoons lime juice
• 1 clove garlic, minced
• 1/4 teaspoon salt
• 2 tsp dill pickles
In a small bowl, mix together all ingredients. Refrigerate until ready to use.
Oven Baked Onion Rings – 6 servings
Recipe based on Ellie Krieger
Adapted by Sara at Imafoodblog.com
Yields about 40 Onion Rings
• 3 Sweet Vidalia Onions (any sweet onion will do)
• 1 large bag Kettle Potato Chips (about 4 Cups)
• 1 tsp Cayenne Pepper
• 1 tsp Garlic Powder
• 1 tsp Onion Powder
• 1/2 tsp salt
• 1/4 tsp black pepper
• 1 Cup plus 1/4 cup Bread Flour or all purpose
• 1 Cup Low Fat Buttermilk
• 1 egg
Preheat the oven to 450F
Cut the onions into 1/2 inch thick rounds. Be sure to make them thick because it will affect the taste and texture of your final product. If you overcook these or cut them too thin they are still good, but you lose that great texture contrast and the sweetness of the onion.
1. In a food processor, crush up the baked potato chips until they are finely ground. Place the ground up chips in a shallow bowl for dredging.
2. Separate the onion slices into rings and discard some of the smaller inner rings as well as any that break. Place the remaining rings into a large resealable plastic bag with 1 cup of flour. Close the bag and give it a good shake so all the onions are coated with flour.
3. Measure out the buttermilk and whisk in the remaining ¼ cup of flour, egg and all the spices.
4. Dip the floured rings into the buttermilk mixture, then coat it with the potato chip mixture, then place it on a cooling rack that’s set on baking sheet.
5. You can spray the rings with some canola oil at this point. Let onion rings sit for at least 15 minutes so coating will stick to onions. If using two baking sheets rotate halfway through top and third rack – nestle little onions inside big ones.
6. Bake for 15-18 minutes until they are golden brown. What you should have is a nicely browned crunchy outside with a sweet soft onion on the inside. Sprinkle with extra salt to taste
![]()
Gettin' figgy with it :)

When life gives you figs, make some sorbet! Lobster brought home a few dozen figs the other day so I had a lot of experimenting to do. I sliced them and ate them with Greek yogurt drizzled with some honey, stuffed them in a pork tenderloin with some blue cheese wrapped in bacon and then finally made some sorbet. As you can see since there's no post for the pork, it didn't make it on the NuM NuM. But the sorbet was surprisingly tasty and refreshing. Who knew it was so easy to make your own sorbet at home! No fancy ice cream maker required - although I am trying everything humanely possibly to justify why I don't need another appliance in my kitchen. Anyway this sorbet was a nice ending to a meal on a hot summer night. I imagine you could swap out the figs for any kind of fruit and it would be just as delicious. Bon Appetit!
Fig Sorbet
Adapted from here
Makes about 6 cups
10 figs (about 1 pound)
1/4 cup water
1/3 cup sugar
1 lemon (untreated, you will need a clean peel)
1 1/2 cup water
Balsamic vinegar
1. Cut the ends (and stem pieces) from the figs, and cut into large chunks (keep the skins on). Add the 1/4 cup water to the fig pieces in a medium frying pan or saucepan and zest the lemon directly into the mix. Cover and cook for 8-10 minutes, stirring occasionally.
2. Add the sugar and one turn of your hand around the pan with some balsamic vinegar and stir with the lid off until they start to break down and get “jamlike.” Remove from heat and let cool. Puree the mixture (I used a mixer) and slowly incorporate the 1 1/2c. water while blending. Taste and add more water and/or lemon juice if necessary.
3. Pour into a freezer-safe dish and freeze for several hours (or use your ice cream machine). (I used a Pyrex glass dish) Set out for 5-10 minutes before serving to soften.
![]()
Brisket Enchiladas

Ole!!! Tonight we traveled to Mexico for some nummy enchiladas. I'm not usually a fan of Mexican food but these were light, super flavorful and spy-say. One enchilada only has 160 calories if you follow the recipe from the website. Que bueno!! Alright, that's about the extent of my Spanish. You might be thinking it's strange to put brisket in enchiladas but I had some leftover from the other night so I morphed the ingredients and made these. It's so nice to take one ingredient and instead of having the same meal twice, you make something entirely new and different. The first night we had brisket sammies, tonight was enchiladas, and manana will be tacos. As you can see we're getting our Mexican fix for the year. I served these with a cold black bean salad and it was a nice contrast to the smokin' hot enchiladas. The salad was decent but a little too "beany" for my taste so next time I would definitely use less beans. If you'd like the recipe you can find it here. Ooh come to think of it, I'll pair these with a refreshing mango salsa next time around. So whenever the mood strikes you for some Mexican food, try these on for a lighter fare.
Brisket Enchiladas
Adapted from Gina's Weight Watcher Recipes
Makes 8 enchiladas
4 servings
1 enchilada = 160 calories
For the sauce:
• 2 garlic cloves, minced
• 2 tbsp chipotle chilis in adobo sauce (including inner seeds)
• 1 1/2 cups tomato sauce
• 1/2 tsp chipotle chili powder
• 1/2 tsp ground cumin
• 3/4 cup fat free chicken broth
• kosher salt and fresh pepper to taste
For the chicken:
• 1 tsp vegetable oil
• 8.5 oz cooked brisket (shredded in a food processor) or substitute chicken breasts
• 1 cup small diced onion
• 2 large cloves garlic, minced
• 1/4 cup cilantro
• kosher salt and pepper
• 1 tsp cumin
• 1/2 tsp dried oregano
• 1 tsp chipotle chili powder
• 1/3 cup chicken broth
• 1/2 cup tomato sauce
• 8 (6-inch) Guerrero corn tortillas
• 1 cup shredded Mozzarella or Mexican cheese
• Nonstick cooking spray
In a medium saucepan, spray oil and sauté garlic. Add chipotle chiles , chili powder, cumin, chicken broth, tomato sauce, salt and pepper. Bring to a boil. Reduce the heat to low and simmer for 5-10 minutes. Set aside until ready to use.
Preheat oven to 400 degrees.
Heat the vegetable oil in a medium skillet over medium-high heat. Sauté onions and garlic on low until soft, about 2 minutes. Add chicken, salt, cilantro, cumin, oregano, chili powder, tomato sauce, chicken broth, and cook 4 to 5 minutes. Remove from heat.
Spray a 13 by 9-inch glass baking dish with non-stick spray. Turn on gas range on stove top and heat tortillas until just pliable (this makes them easier to roll) Put 1/4 - 1/3 cup chicken mixture into each tortilla and roll it. Place on baking dish seam side down. Top with sauce and cheese. Cover with aluminum foil and bake in the oven on the middle rack for 20 minutes. Remove foil and bake an additional 5 minutes. Top with low fat sour cream or scallions if you wish.
![]()
Pork Roasted the Way Tuscans Do and Tassajara Warm Red Cabbage Salad

Surprise! NuM NuM got a face lift! This layout feels like a better reflection of myself...gives me warm fuzzies just lookin' at it. Anyway enough about the re-vamp, on to the nummmmm...the fancy piggy in a blanket or pig/corn dog if you will. Call it what you want...you'll be callin' it delicious!! The picture has you intrigued doesn't it? What is it...what could it be....ooooh the anticipation! It's a roasted pork tenderloin held prisoner inside of a french baguette...it's the world's largest fancy hot dog :)
This entire meal was full of flavors and a party in my mouth! I love it when you make something new and you don't know what to expect and you're pleasantly surprised with a new FAV! I can't wait to make this again. The pork tasted really clean and healthy from the fresh herbs and since the pork actually cooks inside the bread, it releases its juices and gets trapped inside. It's basically the same concept as eating a french dip sandwich and dunking the sandwich in the au jus - but with the pork, it's all wrapped up in a nice little package. Just imagine you get the juicy crunch from the bread, the tangyness from the dijon mustard and the fresh taste of the pork...YUM-OH! It's like eating a mini sammie on a fork. (and you know me and sandwiches)
The red cabbage was also an explosion of flavor. It's so fun eating a dish full of different textures and flavors - crunchy, tangy, salty and sweet all in one bit - oh my gashee. This dish will definitely keep you coming back for more and more.
Both recipes would be great to take on a picnic or serve at your next dinner party. The pork looks so fancy when you present it whole at the table - you'll get lots of oooh's and ahhhh's. The entire meal is 4-star without all the fuss and comes together quickly. You can make the salad while the pork cooks and dinner will be on the table in no time. Try it, you'll look like a rock star - just remember to send me lots of chocolate as a thank you :)
Pork Roasted the Way the Tuscan Do
Adapted from Joanne Weir's Cookbook and Once Upon A Plate
Serves 2-3
2 teaspoons fresh chopped sage
2 teaspoons fresh chopped rosemary
1/2 teaspoon freshly ground black pepper
2 cloves garlic, minced
Kosher salt and freshly ground black pepper
1/4 teaspoon fennel pollen* (I omitted)
4 tablespoons extra virgin olive oil
3 tbs Dijon Mustard
1 pork tenderloin, trimmed of fat and sinewy tissue
1 loaf crusty baguette*
On a work surface, mince the sage, rosemary, pepper, garlic, 1 teaspoon salt, and fennel pollen and dijon together. Brush pork with mixture
Heat a frying pan over medium high heat. Add 1 tablespoon of the oil. Cook the pork, turning occasionally, until golden on all sides, 8 to 10 minutes. Then coat the pork again with the dijon mixture. Cut the baguette in half the long way and scoop out the soft insides. Brush the inside of the baguette with the remaining 3 tablespoons olive oil (optional). (OR do what I did and spray the inside with olive oil PAM spray) Place the pork on the inside of the baguette so that the pork is completely enclosed. Trim off the excess ends of the bread. Tie the baguette, at 1-to 2-inch intervals, with kitchen string.
Preheat an oven to 375°F. Place the pork on a baking sheet and roast until done, 148°F on an instant-read thermometer inserted into the thickest part, 25 to 30 minutes.
Remove from the oven, let rest 10 minutes. Remove the strings and cut into slices. Serve.
* I used a Trader Joe’s Artisan Bread French Baguette. You want to get one that pretty round all around and not too flat in the middle b/c the bread has to "hug" the pork as much as possible. Next time I would also try to scoop out as little bread as possible since that was the best part. (Maybe try leaving a 1/2-inch of bread all along the inside - if this isn't possible it won't matter b/c it'll be delicious even with only a little bit of bread)
* I would also use a 1/2 tsp more of sage and rosemary next time I make this.
**Feel free to swap different herbs for the pork - maybe try thyme for the sage. My next attempt will be with the herb mixture from this recipe.
Tassajara Warm Red Cabbage Salad
Adapted from 101 Cookbooks and The Complete Tassajara Cookbook
Serves 2 to 3

1/4 cup slivered almonds
1/2 teaspoon natural cane sugar (or brown sugar)
fine grain sea salt
1 tablespoons extra-virgin olive oil
1/2 red onion or white onion, diced
2 medium cloves garlic, minced
1/2 pound head of red cabbage, quartered and cut into thin ribbons
1/2 teaspoon fresh rosemary, minced
1 ounces (1/4 cup) golden raisins (or other plump, chopped dried fruit)
1 tablespoons balsamic vinegar
1 ounces (1/4 cup) feta cheese, crumbled
Roast the almonds in a dry skillet over medium heat until golden brown. Sprinkle on the sugar, and a couple pinches of salt. Stir until the sugar melts and coats the seeds (you pan will need to be hot enough). Transfer the almonds to a plate so they don't stick to the pan. Set aside.
Heat the olive oil in a large skillet and saute the onion for a minutes or two with a couple pinches of salt. Stir in the garlic, and the cabbage, and a few more pinches of salt. Stir and cook for just a minute or so, or until the cabbage softens up just a touch. Then stir in the rosemary, most of the raisins, and the vinegar. The cabbage will continue to get more and more tender even after you remove it from the heat, so keep that in mind, and do your best to avoid overcooking it - where it collapses entirely. Fold in the feta cheese, most of the almods, then taste. Season with more salt if needed. Serve garnished with the remaining raisins, more feta, and almonds.
![]()
Thai Tilapia Burgers with Hoisin Mayo and Asian Apple Ginger Slaw

Anytime I tell my brother I'm making fish burgers he always seems less then excited.....hater!! Yet when he finally sits down to eat one he ends up thoroughly enjoying them. These were moist and flavorful and had a nice spicy kick from the jalapeno and red pepper flakes. The coleslaw added a nice crunch to the burgers and also served as a nice refreshing side with the addition of the apples. What I enjoyed most about these recipes was that I had almost all the ingredients in my pantry so dinner came together fast. I also made these fries to go along with the burgers and was finally able to take a picture before they were all consumed. Healthy, quick and light - minus the glutinous fries. You must have balance in your diet I say :) Now, if you'll excuse me I must tend to some brownies that are calling my name from the fridge. If you're wondering which ones they are, they're my: "Holy sh*t these are GOOD brownies!"
Thai Tilapia Burgers with Hoisin Mayo
Adapted from here
3 servings
Tilapia Burgers
3/4 pounds tilapia fillets
1 cloves garlic, minced
1 tablespoons ginger, minced
1/2 jalapeno pepper, seeded & minced, use a smaller amount for less heat
2 tbs minced cilantro
2 tbs panko
1/4 teaspoon salt
1 1/2 tsp peanut butter
1/2 tablespoon soy sauce
1/2 teaspoon brown sugar
1/4 teaspoon red pepper flakes
1 tablespoons lime juice, divided
Hoisin Mayo
1/4 cup mayonnaise
1 tablespoons hoisin sauce
dash of sesame oil
mixed greens
tomato
Burger buns
Directions:
Place 1/3 of the fish in a food processor and process until almost a paste, about 30 seconds. Add remaining fish and pulse until chopped but chunks are still visible.
Place the fish into a bowl. Add garlic, ginger, jalapeno, cilantro, panko, 1/2 tablespoon lime juice and salt.
In a small bowl mix together peanut butter, soy sauce, 1/2 tablespoon lime juice, brown sugar, and red pepper flakes. Add to bowl with fish mixture and combine.
Divide into e portions and shape into burgers. Place on plate; cover with plastic wrap and refrigerate for about 1 hour. If you are starving, you can skip the hour in the frig.
Heat a grill or grill pan to medium high. Grill burgers about 3 1/2 to 4 minutes per side. When burgers are done squirt with extra lime juice all over.
Meanwhile, in a small bowl combine mayonnaise, hoisin sauce and sesame oil. Set aside.
To serve:
Toast buns and slather one side with mayo. Place fish, mixed greens, slaw and tomato on other bun. Combine the two and shove in your mouth :) OR these can also be carb friendly and simply served on a plate topped with a dollop of mayo.
Note: They can also be made in mini size for bite-sized appetizers
Asian apple ginger slaw
2 servings
Adapted from Dinner Impossible
• 1 tbs rice wine vinegar
• 1/2 tablespoons peeled, finely minced fresh ginger root (about 1/2-inch piece)
• 1/2 clove garlic, minced
• tiny bit of chopped fresh flat-leaf parsley
• 2 tbs mayonnaise
• 2 tbs olive oil
• Kosher salt and freshly ground black pepper
• 1 Granny Smith apples , peeled, cored, cut julienne and tossed with lemon juice to prevent discoloring
• 1/4 head cabbage, core removed and sliced chiffonnade or shredded
• 1/4 medium red onion, finely sliced
• 1/2 ripe tomatoes, cut into wedges (or small bite size pieces), or grape tomatoes, halved
Directions
With a mortar and pestle put all ingredients in: the vinegar, fresh ginger, garlic, parsley and mash until you get smooth paste then add mayonnaise and mix then slowly pour the olive oil and mix and adjust the seasoning with salt and pepper,
Toss together apples, cabbage and onion, and stir in enough of the dressing to coat. Gently fold in most of tomato wedges, reserving some for garnish. Taste and adjust seasoning (salt and pepper) if necessary. Serve chilled, garnished with reserved tomato wedges, and with the remaining dressing on the side
Note: If you are making the slaw ahead of time add the apples just before you are ready to serve since they will turn purple b/c of the cabbage.
**I used red cabbage, a Gala apple and omitted the tomatoes and red onion only b/c I didn't have them
![]()
Oven Baked Fries

These fries were NUM! When I cook I'm not a big fan of drowning anything in oil, but these fries were an exception since they were baked instead of deep fried. Apparently in my mind, I can justify anything being baked as healhty, even if it were a big ball of cheese...mmm cheeeese. Anyway, back to the fries.
These were really tasty and had a nice spicy kick to them since there's some cayenne pepper in the mix. The secret ingredient to these fries is the cornstarch. It makes them nice and crispy on the outside but soft in the middle. The first time I tried making these I roasted the minced garlic with the fries and they ended up burning and leaving a bitter taste in my mouth. The next day (yes, I made them two days in a row) I reserved the garlic and sprinkled them on top after the fries were done baking and it was an added yummy bonus. Both lobster and I had KICKIN' breath but they were yummy in the tummy.
Garlicky Oven Fries
Adapted from: Lottie + Doof
4 servings
6 garlic cloves, minced
5 tbsp canola oil
3 russet potatoes (about 8oz each), peeled and each cut into 10-12 wedges
2 tbsp cornstarch/cornflour
1 1/2 tsp kosher salt
3/4 tsp freshly ground black pepper
1/2 tsp garlic powder
1/4 tsp cayenne pepper
1. Preheat oven to 475° F. Adjust oven rack to lowest position. Combine the garlic and oil in a large bowl and microwave until the garlic is fragrant, about 1 minute. Remove garlic and set aside and transfer 4 tablespoons of the oil to a rimmed baking sheet, tilting the sheet to coat.
2. Add the potatoes to the bowl with the remaining oil mixture and toss to coat. Wrap tightly in plastic wrap and microwave on high power until the potatoes are translucent around the edges, 3 to 6 minutes, shaking the bowl to redistribute the potatoes halfway through cooking.
3. Combine the cornstarch, salt, pepper, garlic powder, and cayenne in a small bowl. Sprinkle over the hot potatoes and toss well to coat.
4. Arrange the potatoes in a single layer on the prepared baking sheet and bake until bottoms of potatoes are spotty golden brown, 11 to 14 minutes, rotating baking sheet after 10 minutes. Using metal spatula and tongs, scrape to loosen potatoes from pan, then flip each wedge, keeping potatoes in single layer. Continue baking until fries are golden and crisp, 5 to 10 minutes longer, rotating pan as needed if fries are browning unevenly.
5. Transfer fries to second baking sheet lined with paper towels to drain. Taste the potatoes and season with the reserved garlic from earlier and additional coarse kosher salt and pepper to taste and serve.
**Sweet potatoes are a good substitute since they're sweet and they mellow out the flavor of the spicy cayenne.
![]()
Peanut Butter Chocolate Cheesecake Swirl Brownies

Peanut butter!
Chocolate!
Cheesecake!
Brownies!
Could there possibly be four other perfect words uttered in the english language. Well maybe if they were in Korean....hahaha j/k :P These brownies were sooooo nummy - and quite pretty might I add!! Then again, how could they be bad when you have all those flavors in one dish...LUV IT!!! Moist, dense and fudgey! You can really taste all the flavors individually. The chocolate, the peanut butter, and when you eat them straight from the fridge the cheesecake flavor really comes through - so please resist the urge to eat them straight from the oven (like someone did) b/c they will not taste the same. Thank goodness I'm taking most of them to a friend's for dinner b/c I imagine they won't last very long in our house.
When it comes to brownies everyone has their own personal preference. Some like 'em chewy, cakey, fudgey...or cakey and fudgey....chewy and fudgey...ok, I digress. I personally enjoy a chewy brownie. My only complaint with these brownies are that they're more cakey then chewy. So next time I'll try substituting brown sugar for the white sugar in the brownie layer. Regardless of the texture, these brownies tasted lovely and were a nice change from your standard chocolatey brownie. You can really taste the peanut butter in them so if you love the sweet and salty combo, this one's another winner, winner...brownies for dinner :) 
Peanut Butter Chocolate Cheesecake Swirl Brownies
Adapted from here
Brownie Layer
7-ounces bittersweet, semisweet or milk chocolate, (or a combo of two or all three), finely chopped (if using chocolate chips 7oz = 1 cup plus 1/3 cup)
7 tablespoons unsalted butter, diced
1/2 cup sugar
2 large eggs, room temperature
1 teaspoon vanilla extract
1/2 cup all purpose flour
1 tablespoon unsweetened cocoa powder
1/4 teaspoon salt
Peanut Butter Cheesecake Swirl
8-ounces cream cheese, room temperature
3/4 cup creamy peanut butter*
1 teaspoon vanilla extract
1/2 cup sugar
**1 whole, large egg OR 1 egg yolk if you want a really dense cheesecake batter
DIRECTIONS FOR THE BROWNIE LAYER:
1. Preheat oven to 350F. Line a 9-inch square pan with foil or parchment paper, making sure it goes up all four sides. Use two sheets if necessary. Mist with non-stick spray or grease lightly.
2. Stir chocolate and butter in medium saucepan over low heat until smooth; cool 10 minutes. Using electric mixer on low speed, or stir in with a wooden spoon – sugar, eggs, and vanilla into cooled chocolate mixture, until uniform. Stir/beat in flour, cocoa and salt.
DIRECTIONS FOR THE PEANUT BUTTER CHEESECAKE SWIRL:
1. In a separate bowl, beat together the cream cheese, peanut butter, whole egg or egg yolk, sugar, and vanilla until smooth. DO NOT OVER BEAT!
ASSEMBLE AND BAKE:
1. Spread half the brownie mixture in the pan. Drop large spoonfuls of the peanut butter cheesecake batter across the top of the first layer of brownie batter. Don’t swirl them together. Cover the peanut butter dollops with the remaining brownie batter and the remaining peanut butter cheesecake batter in dollops, then take a knife, spatula, spoon handle, or whatever you have on hand that can ‘swirl’ well, and swirl the TOP layer of peanut butter cheesecake batter with the brownie mixture. Lift up some of the brownie batter to insure the brownie mixture swirls in as much as possible, since it can be little heavier than the peanut butter cheesecake batter, depending on whether you use a whole egg or just the yolk. As mentioned above, it’s ok if some of the first layer of both batters swirl also, just not too much.
2. Bake for 35-37 minutes, or until the batter in the center of the pan feels just set, or a skewer contains a few moist brownie crumbs sticking to it (you would stick the skewer in a chocolate area).
3. Let cool, then lift the brownies up and out using the foil or parchment paper and peel it away/off. Cut the brownies into equal squares. Store in air-tight container in refrigerator so cheescake can set up overnight.
***These brownies taste best when made a day before
Makes about 16 brownies, depending on how large or small you cut them.
* I actually used Ralphs Creamy Roasted Peanuts and Honey Peanut Butter. Sounds totally shady but I enjoyed the flavor just as much as my other fancy shmancy PB I lugged back from a NY trip.
Although I didn’t use it, I think Natural and/or Organic peanut butter would give you a better texture and pure peanut butter flavor, minus all those additives in your basic (rhymes with Blippy, Bif or Beter Ban) supermarket PB. Just pour off the oil.
***My brownies were done at 32 minutes in a standard size oven baked in my baker's edge brownie pan
![]()
Rosemary Polenta

Ooooooh me likey polenta! Where have you been all my life? If you've never had polenta, it's basically corn meal mixed with some milk and chicken stock or water to help loosen it up. It's what Italians eat in place of mashed potatoes and what southerners eat as grits, if that helps you visualize it at all. If you like cornbread then I think you'll like polenta. This was my first time making it and I think I cooked it incorrectly but it didn't matter because the flavor was awesome. The rosemary and red pepper flakes rounded out the dish and made it warm and comforting.
Polenta is a blank canvas so you can add whatever flavors you like and eat it whichever way you like - baked, fried, or even soft like porridge and mashed potatoes. Apparently you're suppose to stir, stir, stir the polenta like risotto for about half an hour but I stopped after ten minutes since it was looking like a loose porridge and tasted yummy. Next time I'll have to try the full half hour and see how that turns out. If you want to serve polenta as a substitute for mashed potatoes you must serve it the second you take it off the stove because it'll get thick right away when you serve it. However if you're going to let it cool and cut into squares then it's great to make ahead of time before guests arrive. This was a great new discovery and I am foreseeing many more meals with polenta in the future!!
Here are a few more variations recommended by Heidi from 101 Cookbooks:
- Cut the polenta slab into small cubes and pan-fry them in a little bit of oil until you've got a crunchy crouton - perfect for salads and soups.
- Cut it into cookie-sized rounds, layer them in a casserole with a favorite pasta sauce and some cheese, bake, and you've got a great family-style dinner.
- Cut into little diamond-shapes or squares rubbed with olive oil or sprayed with olive oil PAM, grill or bake in 450 degree oven, middle rack, for 20 minutes or until golden and crispy OR try to broil the slices under the broiler until crispy. Flip once after ten minutes, and use as a crostini base.
Rosemary Polenta
Adapted from Barefoot Contessa
4-6 servings
• 2 tbs butter or (I can’t believe it’s not butter)
• 2 tbs olive oil
• 1/2 tablespoon minced garlic (2 cloves)
• 1/2 teaspoon crushed red pepper flakes
• 1/2 teaspoon minced fresh rosemary leaves
• 1/4 teaspoon kosher salt
• 1/4 teaspoon freshly ground black pepper
• 1.5 cups chicken stock, preferably homemade
• 1 cups half-and-half
• 1 cups milk
• 1 cups medium grain coarse cornmeal (Bob's Red Mill Corn Grits Also Known As Polenta)
• 1/4 cup good grated Parmesan
• Flour, olive oil, and butter, for frying
Directions
Heat the butter and olive oil in a large saucepan. Add the garlic, red pepper flakes, rosemary, salt, and pepper and saute for 1 minute. Add the chicken stock, half-and-half, and milk and bring to a boil. Remove from the heat and really slowly sprinkle the cornmeal into the hot milk while stirring constantly with a whisk. Cook over medium heat, stirring constantly with a wooden spoon. Polenta pops like lava when boiling, so exercise caution! Stir continuously, bringing the mixture up from the bottom of the pot and loosening it from the sides. The cornmeal becomes polenta in 35-45 minutes, when it forms a mass that pulls cleanly away from the sides of the pot Off the heat, stir in the Parmesan and season with more salt. Serve immediately if serving soft and hot.
Variations:
For firm crispy polenta:
Pour hot polenta into a 9 by 13 by 2-inch pan, smooth the top, and refrigerate until firm and cold.
Cut the chilled polenta into 12 squares, as you would with brownies. Lift each one out with a spatula and cut diagonally into triangles. Dust each triangle lightly in flour. Heat 1 tablespoon olive oil and 1 tablespoon butter in a large saute pan and cook the triangles in batches over medium heat for 3 to 5 minutes, turning once, until browned on the outside and heated inside. Add more butter and oil, as needed. Serve immediately.
Polenta Slices:
Method from back of Bob's Red Mill bag
Spoon hot polenta into a oiled bowl or 9 by 13 by 2-inch pan and let set for 10 minutes. Invert onto a flat plate, mixture will unmold and hold its shape. Cut poltenta into thick slices or squares and serve hot. Top with any sauce you desire or freshly grated cheese.
![]()
Parmesan Black Pepper Biscotti

Lobster and I were having friends over and I thought it would be the perfect opportunity to make these biscottis. I love anything remotely close to the bread and cheese family so I was really excited about making them. After reading over the recipe, I realized it was a lot more tedious then I had hoped so I wanted the end result to be worth it. Alas, while these did taste good and I'm glad I got to knock a recipe off my "TO DO" list, the effort far exceeded the results. While they were tasty, they weren't earth shattering or made me want to do the happy dance - and I was so looking forward to oooohing and ahhhing about them to you. I wasn't super excited probably because they reminded me of a Cheez-It cracker and it seemed like way too much effort to make a gourmet cracker. I think if it took half the time to make them, I would've been more excited. Although, I'm glad I made a large amount so I can snack on them all week or freeze for another time. But if you have a lot of time before a dinner party these would be great to serve as appys for a cheese and wine party b/c they were great with prosciutto and spread with.......yes, a little more cheese :)
Parmesan Black Pepper Biscotti
Adapted from Gourmet
Makes 5 to 6 dozen biscotti.
1 1/2 tablespoons whole black peppercorns
4 cups all-purpose flour plus additional for dusting
2 teaspoons baking powder
2 teaspoons salt
4 1/2 oz Parmigiano-Reggiano, finely grated (2 1/4 cups)
1 1/2 sticks (3/4 cup) cold unsalted butter, cut into 1/2-inch cubes
4 large eggs
1 cup whole milk
Special equipment: an electric coffee/spice grinder
Put oven racks in upper and lower thirds of oven and preheat oven to 350°F. Pulse peppercorns in grinder until coarsely ground.
Whisk together flour, baking powder, salt, 2 cups cheese, and 1 tablespoon ground black pepper in a large bowl. Blend in butter with a pastry blender or your fingertips until mixture resembles coarse meal. Whisk 3 eggs with milk and add to flour mixture, stirring with a fork until a soft dough forms.
Turn dough out onto a lightly floured surface and quarter dough. Using well-floured hands, form each piece into a slightly flattened 12-inch-long log (about 2 inches wide and 3/4 inch high). Transfer logs to 2 ungreased large baking sheets, arranging logs about 3 inches apart.
Whisk remaining egg and brush some over logs, then sprinkle tops of logs evenly with remaining 1/4 cup cheese and 1/2 tablespoon ground pepper. Bake, rotating sheets 180 degrees and switching position of sheets halfway through baking, until logs are pale golden and firm, about 30 minutes total. Cool logs to warm on sheets on a rack, about 10 minutes.
Reduce oven temperature to 300°F.
Carefully transfer 1 warm log to a cutting board and cut diagonally into 1/2-inch-thick slices with a serrated knife. Arrange slices, cut sides down, in 1 layer on a baking sheet. Repeat with remaining logs, transferring slices to sheets. Bake, turning over once, until golden and crisp (biscotti must feel hard and solid), 35 to 45 minutes total. Cool biscotti on baking sheets on racks, about 15 minutes.
Do ahead: Biscotti keep in an airtight container at room temperature 2 weeks.
![]()
Baked Sweet Potato Fries

These sweet potato fries would be a nice compliment to any spicy entree. Tonight I served them with a hot and spicy pork chop. I had high hopes for the pork since I'd seen it on several other food blogs, but I didn't think it was anything special so I'll spare you from the recipe. However, the spice mixture for these sweet potatoes were a nice change from my standard recipe since I usually season them with just some S&P. I didn't get a chance to make the dip since these were delicious on their own, but I'm sure the dip is just as good. This was a quick and easy recipe that would be great with any burger or sammie. Next time I'll try and substitute the potatoes with butternut squash to make them even healthier. But these were tasty - nice and crispy on the outside and soft in the middle.
Baked Sweet Potato Fries
Adapted from Our Best Bites
3 to 4 servings
2 medium-sized sweet potatoes*
2 T extra virgin olive oil
1/2 t cumin
1/2 t oregano
1/2 t coriander
1 t Lawry’s Garlic Salt with parsley
fresh ground pepper (about 10 turns of a pepper mill)
*you want 1lb sweet potatoes after they are peeled, sliced, etc. If you weigh them at the store make sure you have a little more than a pound to allow for the peeling, and tossing of small pieces.
Preheat oven to 425 degrees. Spray a cookie sheet lightly with cooking spray and put in oven while oven is coming to temperature. You want them right on the cookie sheet.
Slice your sweet potatoes into french fry shape and size. You want them to be about a 1/2", do not cut them into steak fries b/c they tend to get a bit soggy so staying small is gets the best results.
It's important that all of the pieces are evenly sized to ensure even cooking. So toss any irregular pieces aside (or eat them in another dish).
Put the sweet potatoes in a bowl and drizzle the olive oil over them or spray with Olive Oil PAM. Use your hands to make sure each one is coated. If you've got more than a pound of sweet potatoes, add a little extra olive oil. They should all be glistening, just eyeball it.
Then sprinkle on all of the herbs and spices and continue to toss until well coated.
Take the baking sheet out of the oven and place the fries directly on a baking sheet. It's very important that they are not touching, but can place them pretty close together.
*if you end up needing more than one cookie sheet make sure they are spaced more than one rack apart in your oven to prevent steaming. Also, rotate the pans when you take them out to flip.
Place cookie sheet in pre-heated oven and set the timer for 15 minutes. Don't open the oven door, not even for a peak! Let them do their thing.
After 11-12 minutes take pan of oven and flip the fries. Put the pan in the oven and cook for another 10-15 minutes. Just keep an eye on them. Crispy crunchy on the outside, and sweet and soft in the middle.
Take them out of the oven and serve immediately. They cool off very quickly so they're best eaten right away.
Honey-Lime Dip for Sweet Potato Fries
6oz container plain, low-fat yogurt
1 T mayo (low cal is fine)
1/2 T honey
1/2 lime
1/4 t cumin
1/8 t oregano
1 t parsley
1/2 t granulated onion
3/4 t kosher salt
Mix honey and yogurt until combined and give it a big squeeze from the lime half. Add in spices and herbs and you have a dip
![]()
Subscribe to:
Posts (Atom)